Map Vendor Codes
- Click View Selector and then click Vendor Code Mappings.
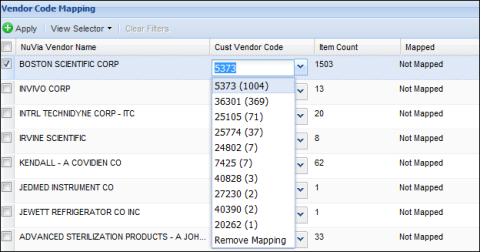
- Consider these columns in the list:
- NuVia Vendor Name – NuVia’s name for the vendor
- Customer Vendor Code – Drop-down containing the various codes NuVia found in your item file and the number of items matched to the code
- Item Count – Total number of items NuVia found associated with the code
- Mapped – Mapped or not mapped.
- Find a vendor with a high item count.
- Click the Cust Vendor Code drop-down for the vendor.
- Examine the list of codes used for this vendor.
Tip: If a vendor has more than one vendor code associated with it, go to your Virtual Item Master and locate items purchased from each vendor (code). Consolidate vendor codes if possible.
- Click the code to which you want to map, or type a code in the field.
Tip: Reference the item count in parenthesis next to each code. It is recommended that you select the code with the highest item count.
- Repeat steps 4 through 6 for each code you need to map.
Note: The fields you mapped are outlined in blue.
- Verify that the checkbox next to each vendor you mapped is checked.
- Click Apply.
- Click Yes to confirm your action.