Platform Exchange Test
Overview
The Platform Exchange Test (PET) process is an integrated approach for EDI testing. It uses the Automated Test Supplier (ATS), which is an internal GHX supplier that providers use to test standard responses received in return documents from suppliers or distributors. You can use this self-managed functionality to test EDI transactions during the project implementation and post go-live with your MMIS. This job aid contains details about the PET process, instructions for registering the ATS, and definitions of transaction statuses to use when monitoring testing results.
-
Using the PET process has the following benefits:
-
Reduces the need to coordinate with a real supplier or GHX engineer
-
Avoids disruption to current active accounts and product traffic
-
Return documents are instantly generated
-
Assists the team through better understanding of how EDI values will load and process in your MMIS
-
Test the core EDI transactions: purchase orders (850), purchase order acknowledgments (855), advance ship notices (856), and invoices (810)
-
To use the GHX Automated Test Supplier (ATS):
Register the ATS in GHX Registration Center
-
Create the vendor in your organization’s MMIS using GHX Registration Center information
-
Reference the GHX ISA/GS envelope value for your MMIS
-
Ensure the ship to account number exists in both GHX and your MMIS
The following acknowledgement scenarios are available with the ATS:
-
Backorder
-
UOM discrepancy
-
Partial backorder
-
Vendor part number discrepancy
-
Partial backorder in multiple acknowledgements
-
Add taxes
-
Line rejection
-
Add shipping fees
-
Price discrepancy
-
Add taxes and shipping fees
-
Quantity discrepancy
-
Add discount terms
Required System Access
You must have access to the following systems and solutions:
-
GHX Registration Center
-
GHX My Exchange
Available Resources
The following resources are available to give you more information about the PET:
-
Video #1, Introduction to Automated Test Supplier
-
Video #2, Setting up Automated Test Supplier
-
Video #3, Checking ATS Transactions
-
My Exchange product help topic, Understanding Transaction Statuses
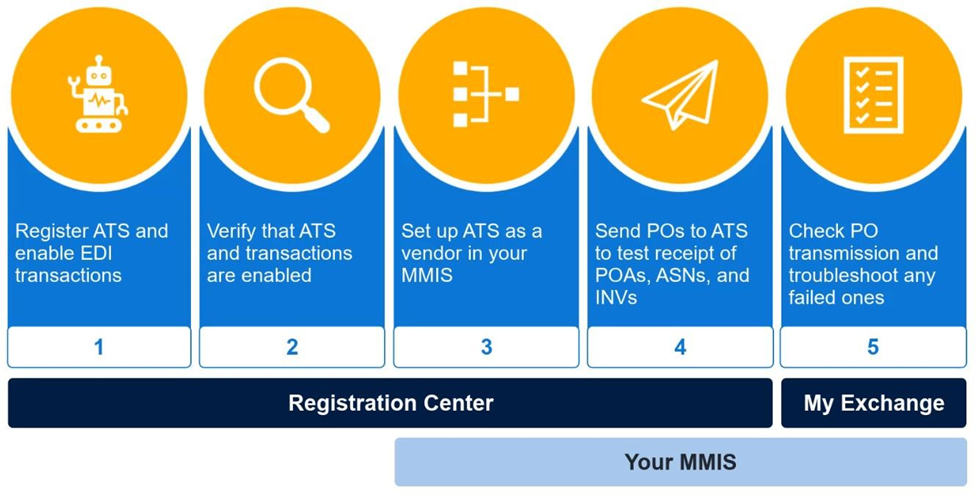
Set up the ATS
There are five steps to setting up the ATS.
-
Register the ATS and enabling EDI transactions.
-
Verify the ATS and transactions are enabled.
-
Set up the ATS as a vendor in your MMIS.
-
Send POs to the ATS to test receipt of POAs, ASNs, and INVs.
-
Check PO transmission in My Exchange.

Step 1: Register the ATS and enabling EDI transactions
-
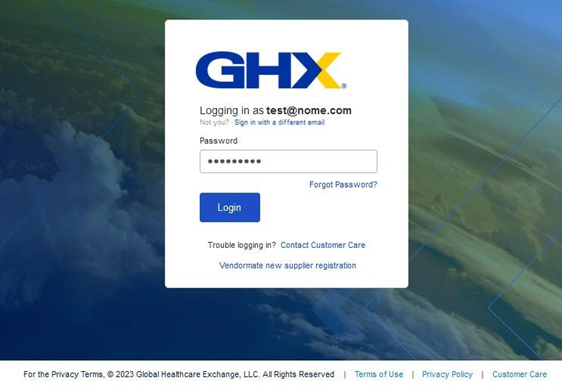
Go to https://login.ghx.com. The GHX log in page opens.


-
Type your email address and click Next. The password page opens.

-
Type your password and click Login. The single sign on page opens.


-
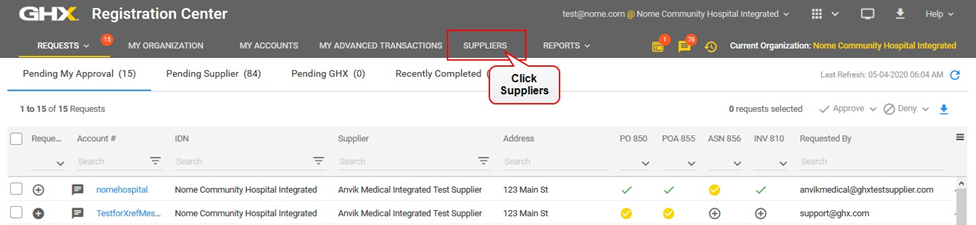
Click Registration Center. The Requests page opens.

-
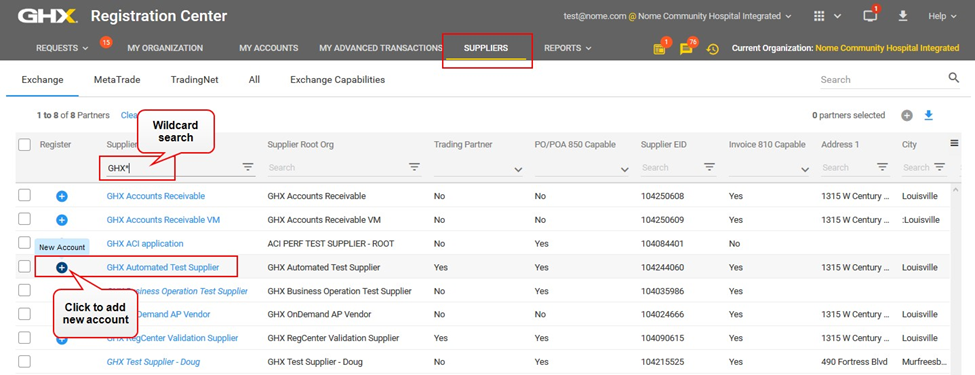
Click Suppliers.
-
Type GHX* in the Supplier column and press ENTER to search for the correct supplier name.
Tip: Registration Center uses wildcard search. This means that you can use the asterisk * wildcard character in certain fields to narrow your search results.
-
Click the plus
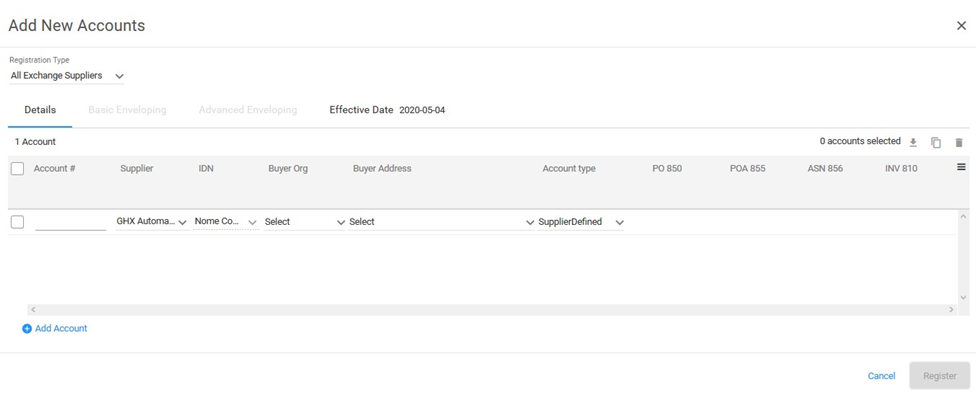
 icon to the left of the GHX Automated Test Supplier account. The Add New Accounts dialog box opens.
-
Add a new account number under your organization/IDN name using the format shown in the following table. Separate each segment with a dash (for example, ATS-NCH-CA).
Segment
Definition
First three letters
ATS (for Automated Test Supplier)
Middle three letters
Hospital name abbreviation
Last two letter
State abbreviation
-
Select the following account criteria.
Note: Registration Center automatically defines the IDN and Account type column values.Column
Value
Supplier
GHX Automated Test Supplier (AUTOTESTSUP)
Buyer Org
An organization to use with the test account number
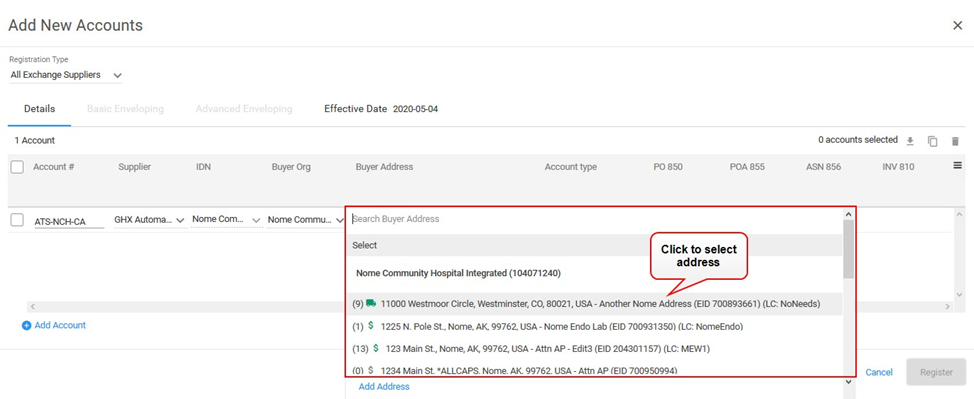
Buyer Address
An internal ship-to address to associate with the test account number
-
Select the business processes (transactions) you would like to enable for testing.
Note: When a PO (850) is transmitted from your MMIS system, the ATS will return an order acknowledgment (855), an advance ship notice (856), and an invoice (810). However, the options you see may vary depending on your organization’s system or project. -
Click Register. A summary message opens.

-
Click OK.
-
Contact your GHX Implementation Team and ask that they manually enable the requested business processes.
Step 2: Verify the ATS and transactions are enabled
-
Log on to Registration Center.
-
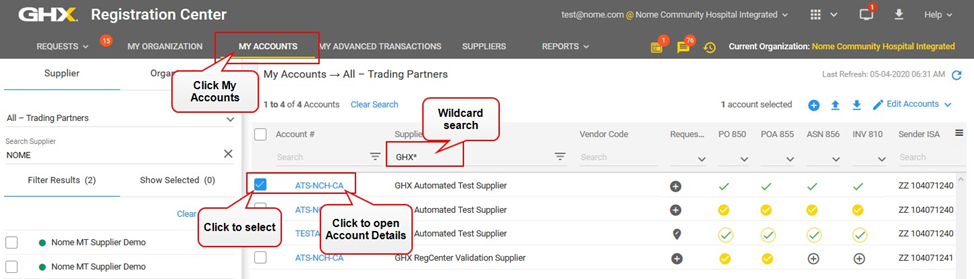
Click My Accounts.

-
Type GHX* in the Supplier column header and press ENTER to search for the supplier.
-
Click the checkbox to the left of the ATS name.
-
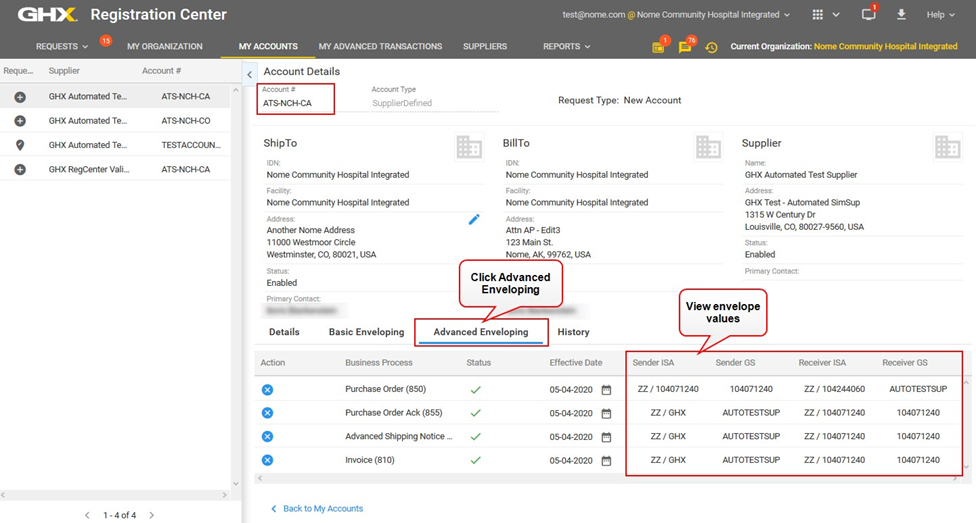
Click the link in the Account # column for the ATS account that you created and registered. The Account Details page opens.

-
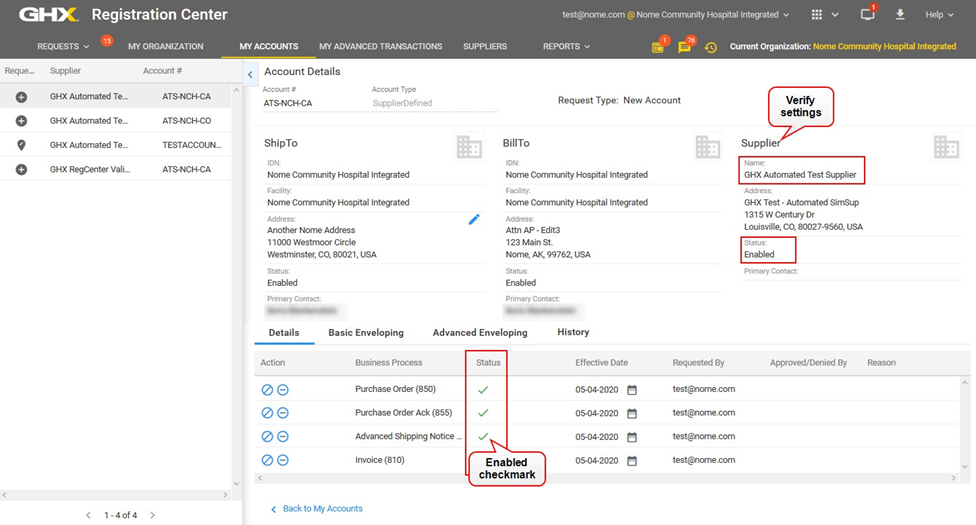
Verify the following information in the Supplier area on the right:
-
The Name should be GHX Automated Test Supplier
-
The Status should be Enabled
-
-
Scroll down to the Details tab and verify that the Status column for each business process has a green checkmark. This is an Enabled status.
Step 3: Set up the ATS as a vendor in your MMIS
Use the following sender and receiver ID values to set up the ATS as a vendor in your MMIS.
|
Field Description |
EDI Field Name |
Value to Populate |
|---|---|---|
|
ISA Sender Qualifier |
ISA.05 |
ZZ or 01 See “View ISA and GX field values” to locate the value for your organization. |
|
ISA Sender ID |
ISA.06 |
This is your organization’s DUNs value. |
|
ISD Received Qualifier |
ISA.07 |
ZZ |
|
ISA Receiver ID |
ISA.08 |
GHX or GHXNEO See “View ISA and GX field values” to locate the value for your organization. |
|
GS Sender ID |
GS.02 |
This is your organization’s DUNs value. |
|
GS Receiver ID |
GS.03 |
AUTOTESTSUP |
|
Ship to Account |
N1ST.04 |
The account that was created in Registration Center. |
View ISA and GS field values
To locate these values in Registration Center:
-
Log on to Registration Center.
-
Click My Accounts.
-
Type GHX* in the Supplier column header and press ENTER to search for the supplier.
-
Click the checkbox to the left of the GHX Automated Test Supplier name.
-
Click the link in the Account # column for the ATS account that you created and registered. The Account Details page opens.
-
Search for the ATS account number (for example, ATS-NCH-CA).
-
Click the Advanced Enveloping tab and scroll to the right to view the envelope values.

Step 4: Send POs to the ATS to test receipt of POAs, ASNs, and INVs
The table below contains a list of standard acknowledgement types that are in POAs. When creating the test PO, enter the scenario name in the PO header level “MSG segment of the EDI 850 (PO)” using the table below.
Example of where the PO message populates in EDI format.
ISA^00^ ^00^ ^ZZ^101010021 ^ZZ^GHX ^180607^1107^U^00401^100729101^0^T^|~ GS^PO^101010021^AUTOTESTSUP^20180607^100729101^1^X^004010~ ST^850^0001~ BEG^00^NE^TESTPO002^^20180607~ N9^ZZ^Notes~
MSG^BACKORDER~
N1^ST^GHX Automated Test Supplier^91^AUTOTEST1234~ N3^101 Test Dr~ N4^DENVER^CO^80234^US~ PO1^001^1^EA^5.00^^VC^TESTPART01~ …
N1^ST^GHX Automated Test Supplier^91^AUTOTEST1234~ N3^101 Test Dr~ N4^DENVER^CO^80234^US~ PO1^001^1^EA^5.00^^VC^TESTPART01~ PO1^002^1^BX^10^^VC^TESTPART02~ SE^9^0001~ GE^1^1~ IEA^1^100729101~
|
Scenario |
EDI Business Process |
Scenario Outcome |
|---|---|---|
|
BACKORDER |
855 |
Line #1 of the PO is backordered. |
|
PARTIALBACKORDER |
855 |
Line #1 of the PO is partially backordered. |
|
PARTIALBACKORDERMULTIACK |
855 |
Line #1 of the PO is partially backordered, which creates multiple ACK segments. |
|
REJECT |
855 |
Line #1 of the PO is rejected. |
|
PRICE |
855 |
Line #1 of the PO has a price difference. |
|
QTY |
855 |
The UOM will be changed to EA unless the original PO already contains an EA. In that case, the UOM will be changed to BX. The quantity will be returned twice the amount of the original PO quantity. |
|
UOM |
855 |
Line #1 of the PO has a UOM difference. The quantity will be the same. |
|
PARTCHANGE |
855 |
The vendor part number will be changed on line #1. |
|
TAXES |
810 |
Federal, state, and local taxes will be added to the invoice at the summary level. |
|
FREIGHT |
810 |
A shipping charge will be added to the invoice at the summary level. |
|
HANDLINGANDTAX |
810 |
Both taxes and shipping charges will be added to the invoice at the summary level. |
|
TERMDISCOUNT |
810 |
A 1%,15-day terms discount will be offered on the invoice. |
|
LINENUMCHANGE |
810 |
Adds three leading zeros to line number 1. |
|
INVCHANGEPO |
810 |
Adds _INV to the PO number. |
|
DSCA |
810 |
This test case simulates the standard Drug Supply Chain Security Act (DSCSA) values sent by GHX pharma suppliers. Additional tracking information will be sent in the shipment notice (856). |
|
CONSIGNMENT |
810 |
If the BEG01 value is CN or if CONSIGNMENT is in the N9/MSG segments, the order is treated as a consignment use case. If the lot or serial number values are provided in the 850, they will be mirrored in the item lines of the 855, 810, and 856. |
|
MAX |
810 |
The maximum EDI data requirements for the GHX 855, 810, and 856 will be returned. |
Raw EDI Examples
The following table contains examples of the raw EDI for various scenarios.
|
Scenario |
Raw EDI Scenario Example |
|---|---|
|
BACKORDER |
ACK^IB^3^CA^^^^VC^SLT2025G2525~ |
|
PARTIALBACKORDER |
PO1^1^3^CA^017^^VC^SLT2025G2525~ PID^F^^^^Tubing -Oxygen 25 Ft. Green~ ACK^BP^1^CA^29.4^20200424^^VC^SLT2025G2525~ |
|
PARTIALBACKORDERMULTIACK |
PO1^1^3^CA^017^^VC^SLT2025G2525~ PID^F^^^^Tubing - Oxygen 25 Ft. Green~ ACK^IA^1^CA^29.4^20200424^^VC^SLT2025G2525~ ACK^IB^2^CA^^^^VC^SLT2025G2525~ |
|
REJECT |
PO1^1^3^CA^29.4^^VC^SLT2025G2525~ PID^F^^^^Tubing - Oxygen 25 Ft. Green~ ACK^IR^3^CA^^^^VC^SLT2025G2525~ |
|
PRICE |
PO1^1^1^EA^6.65^^VC^120380^IN^120380~ ACK^IP^1^EA^017^20200401^^VC^120380~ |
|
QTY |
PO1^1^3^EA^29.4^^VC^SLT2025G2525~ PID^F^^^^Tubing - Oxygen 25 Ft. Green~ ACK^IC^6^BX^017^20200424^^VC^SLT2025G2525~ |
|
UOM |
PO1^1^5^BX^15.06^^VC^103878^ ACK^IC^5^EA^017^20200401^^VC^103878~ |
|
PARTCHANGE |
PO1^2^15^CA^118.15^^VC^103368^IN^103368~ ACK^IC^15^CA^017^20200401^^VC^103368-1~ |
|
TAXES |
TXI^FD^2.50~ TXI^LS^1.50~ TXI^OH^1.00~ |
|
FREIGHT |
SAC^C^G830^^^1000^^^^^^^^^^SHIPPING CHARGE~ |
|
HANDLINGANDTAX |
TXI^LS^1.50~ SAC^C^G830^^^1000^^^^^^^^^^SHIPPING CHARGE~ |
|
TERMDISCOUNT |
ITD^01^3^1^^15^^30~ |
Step 5: Check the PO transaction in My Exchange
After you have sent POs to the ATS, verify in My Exchange that those POs transmitted.
-
Go to https://login.ghx.com. The GHX log in page opens.
-
Type your email address and click Next. The password page opens.
-
Type your password and click Login. The single sign on page opens.

-
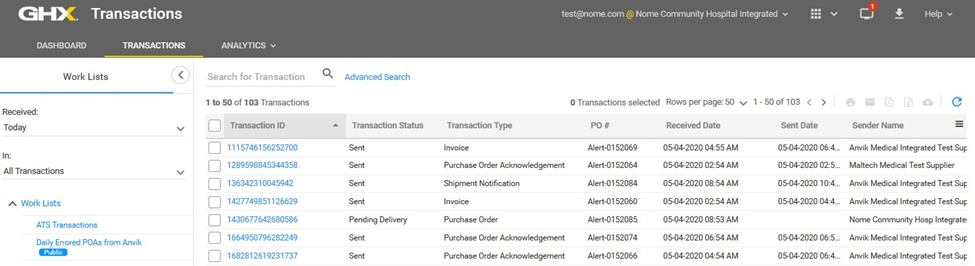
Click Transactions in the My Exchange list. The Dashboard opens.
-
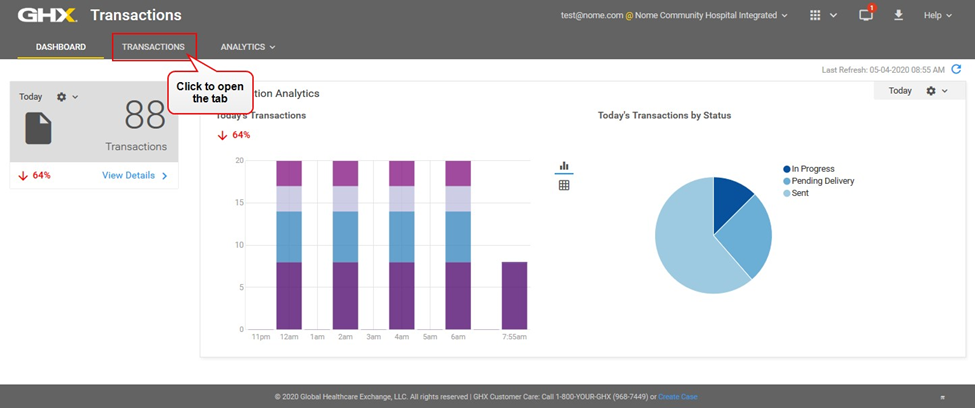
Click the Transactions tab.
-
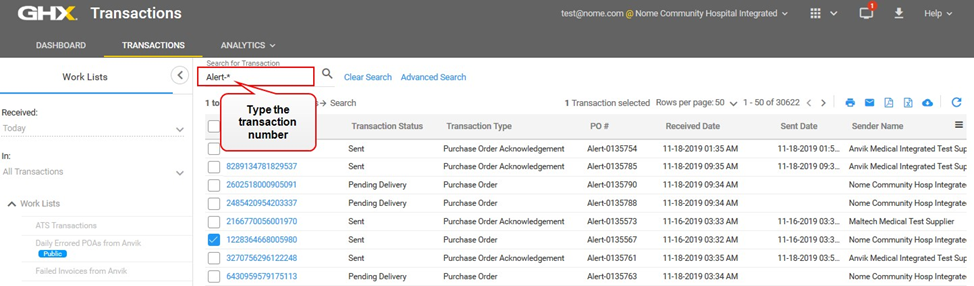
Type the PO number in the search field and press ENTER to search for that transaction.
Tip: My Exchange uses wildcard search. This means that you can use the asterisk * wildcard character in certain fields to narrow your search results.
-
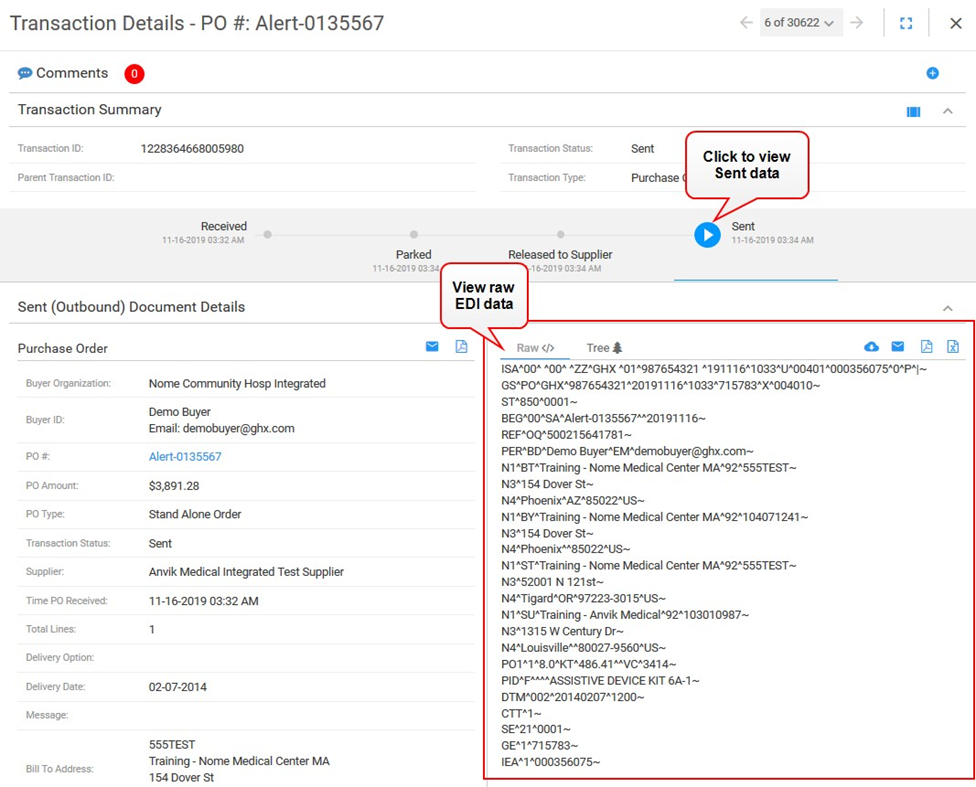
Click the link in the Transaction ID column. The Transaction Details dialog box opens.
-
Click the Received icon to view the raw EDI that was received. This is the data that originated from your MMIS, the Connect Plus server, or directly from your Cloud MMIS.
Note: When GHX receives your PO, there are two key EDI values that the system looks for:
-
The GS03, which is the receiver ID
-
The N1ST04, which is the supplier account number

-

-
Click the Sent icon to view the raw EDI that was sent to the test supplier.

Transaction Statuses
The most common transaction statuses in My Exchange are:
-
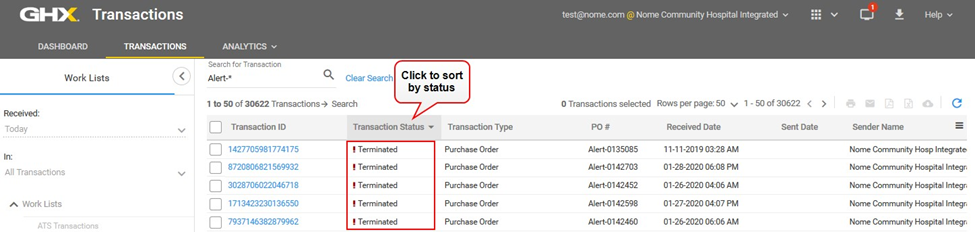
Terminated – Indicates the transaction has been stopped and did not make it to the recipient. The most likely reasons are an invalid account number or receiver ID/GS03 value.
-
Sent – Indicates the Exchange has sent the transaction to your trading partner.
-
In Progress – Indicates the Exchange is sending the transaction to your trading partner.
See the “Understanding Transaction Statuses” topic in the My Exchange product help for a complete list of statuses and their descriptions.
Troubleshooting Failed Transactions
Failed POs
-
Log on to My Exchange > Transactions.
-
Search for the transaction and check the transaction status. If the status is Terminated, do the following.
-
Ensure the GS03 (receiver ID) and N1ST04 (supplier account number) values are correct.
-
Note: These values that come across from your MMIS in the EDI must match the values in Registration Center.
-
-
Ensure the business process (transaction) is enabled in Registration Center.
-
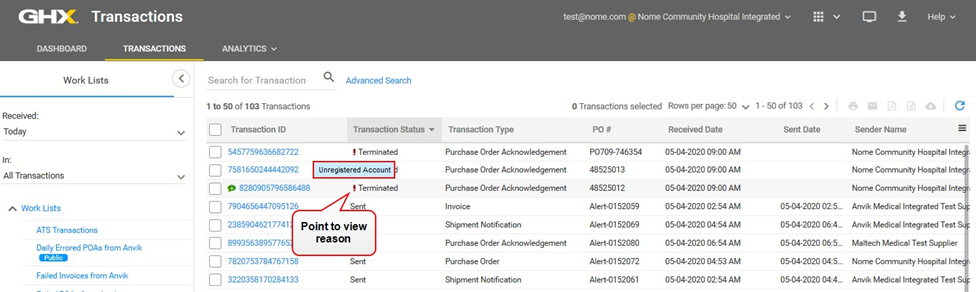
Tip: For transactions with a Terminated status, hover on the exclamation point to view a reason.
-
-
Ensure the MMIS values are correct.
-
Missing POs
-
Check your MMIS logs to see if it failed in your MMIS.
-
Log on to My Exchange > Transactions.
-
Search for the PO number.
-
Check the values in the Transaction Status column.
Tip: For transactions with a Terminated status, hover on the exclamation point to view a reason.
-
Verify the supplier ID.
-
If the information is correct, contact your GHX project lead (if one has been assigned).
Tip: Your GHX project lead may be an Enterprise Solutions Executive or a Customer Care (support) contact.