Add New Users
Users with the Manage access level can add new users individually or in bulk. This topic contains instructions for adding individual users. See Add Multiple Users in Bulk for instructions for adding multiple user accounts using a Microsoft Excel template.
- Click the Users tab. The Users page opens.
- Click the Add New
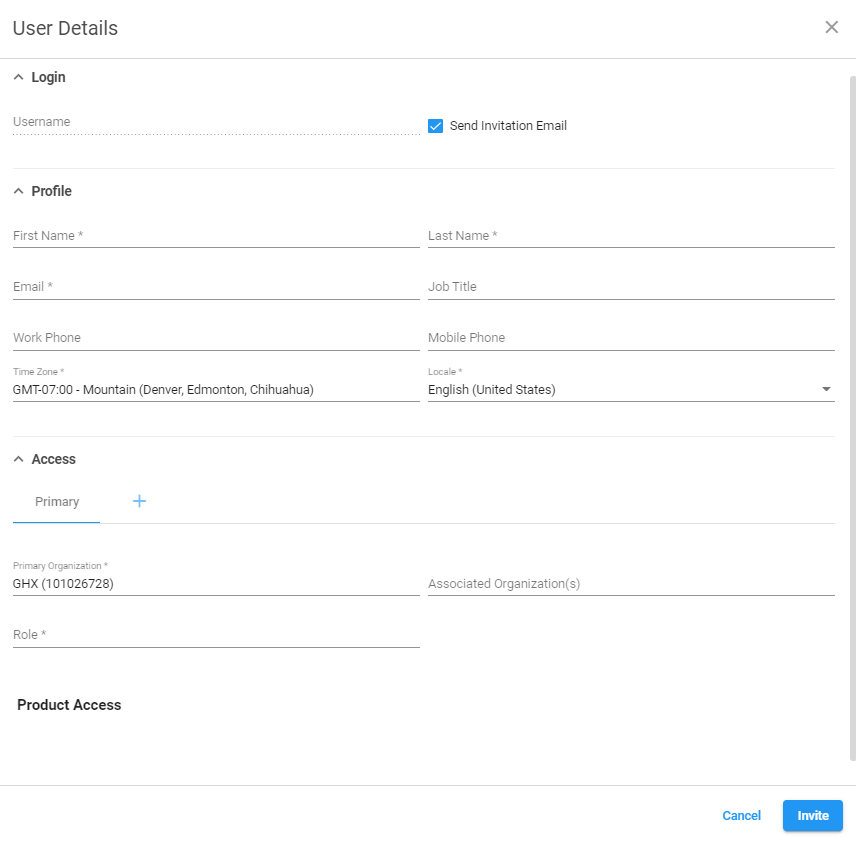
 icon in the right pane. The User Details dialog box opens.

-
Skip the Username field.
Note: You cannot edit this field. User Management will use the Email field value in the Username field.
- Type the required information in the Profile area. Required fields are marked with an asterisk *.
Tip: Adding more information makes it easier to work in the applications.
 Profile fields
Field Description First Name Contains the user's first name. Last Name Contains the user's last name. Email Contains the user's email address. This is the user's single sign on user name. Job Title Contains the user's job title. Work Phone Contains a work phone number. Mobile Phone Contains a mobile phone number.
Tip: Some applications, like Notifications, use this value to send SMS text messages.
Time Zone Contains a list of Greenwich Mean Time (GMT) time zones. Locale Identifies the user's preferred language.
Primary Organization Identifies the organization to which this user is assigned. The user will see the activity for only this specific organization. Associated Organization Identifies additional organizations to which this user is assigned. Role Identifies the domain role. This value determines which individual products the user can access. Options include:
- User
- Customer Administrator
- Manager
- Custom roles specific to your organization
See Domain Roles for details.
Note: You may also see roles that begin with the letters EGX. Currently, GHX requires those for certain products, but you should not select these when adding a new user.
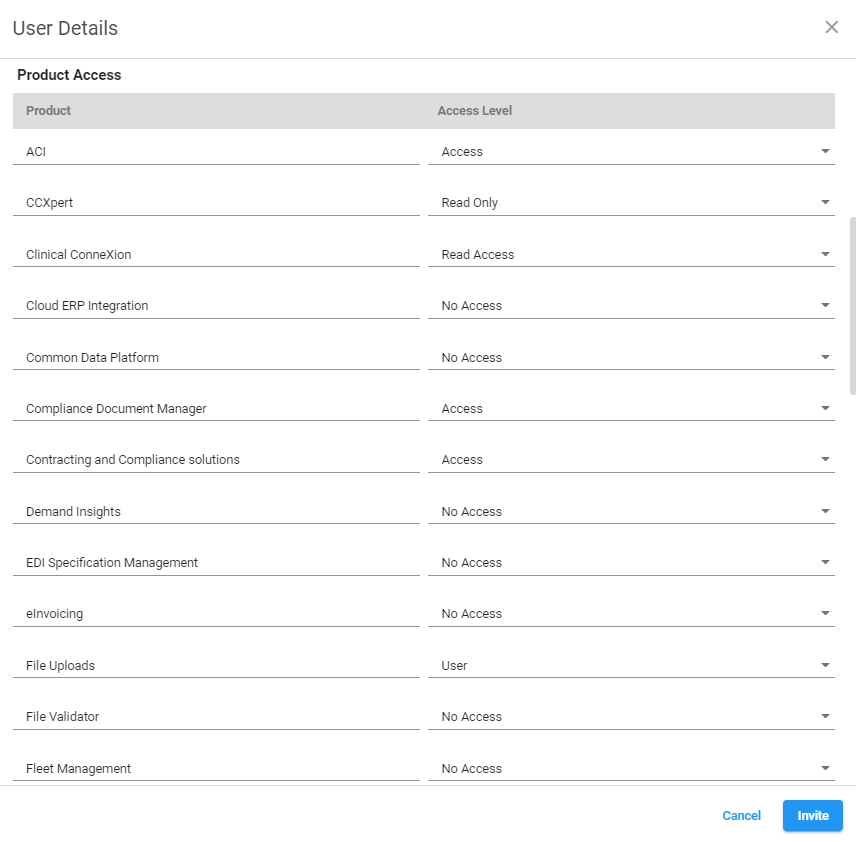
- Scroll down and verify the products listed in the Product Access table.
Note: This table contains a list of products to which your organization subscribes. The values in the Access Level column are the default values for each product.
 GHX Data Connect User Considerations
Data Connect is always set up at the IDN level. To access Data Connect the IDN level organization must be the primary organization for the user. If the IDN organization is set up as an alternate, the Data Connect access will not work.
- Modify the access levels for special cases (optional).
For example, a specific employee with the User domain access must also use Procurement Suite. However, your organization's default access level for the User role is No Access. In this case, you could select an available Procurement Suite option in the Access Level column list, such as Approver.
Tip: Redacted Access masks protected health information (PHI) and financial data on 850 and 820 transactions.
- Click Invite. User Management sends an email message to the email address associated to that user profile. This message contains instructions and a link the user can click to create a password.
Tip: This email message will normally originate from the support@ghx.com mailbox. Therefore, your organization may want to add this address to your white list so these messages will not end up in a junk folder. If you are logging on to a lower environment (for example, integration), the email address will originate from the noreply@ghx.com mailbox.