Troubleshooting Guide: Invoice Failure Troubleshooting for Suppliers
Welcome
GHX is excited to help automate your invoicing processes so you can work smarter, and not harder! eInvoicing is designed to help you better manage invoice delivery to non-EDI capable customers, troubleshoot unfortunate instances of invoice delivery failure, and resend invoices when failures happen.
This document shows you how to:
-
Identify invoice failures in eInvoicing
-
Confirm how the customer receives invoices
-
Submit a registration request for an EDI 810 business process (Invoice)
-
Grant customer users access to the eInvoicing Portal
-
Configure the customer organization for email delivery
-
Resend the failed invoice
Invoice Failure Troubleshooting Steps
Step 1: Identify Invoice Failure
-
Log in to GHX (https://login.ghx.com).
Note: If you do not have login credentials, open a support ticket at support@ghx.com to request access. Include your full name, organization, specific divisions if applicable, and email address. -
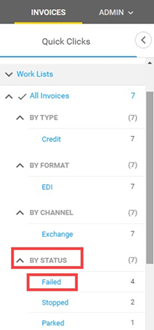
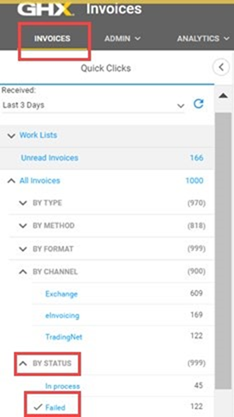
Click Invoices.

-
Click Failed in Quick Clicks. Invoices that failed to deliver display.
 Note: Use the drop-down Received menu to narrow down failed invoices to a specific period, including Today, Yesterday, Last 3 Days, Last 7 Days, Last 2 Weeks, Last 30 Days, and Last 3 months.
 -
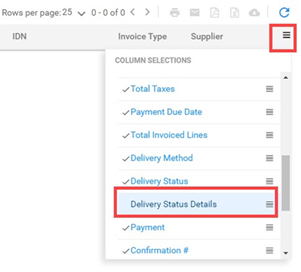
Click an invoice number to open the invoice summary and verify the invoice failure reason next to Delivery Status Details.
-
Most common failed deliveries with invoices occur due to one of the following:
-
The Ship To account is not enabled or registered as an GHX-integrated customer
-
The customer’s Payer ID does not have eInvoicing portal access
-
The customer’s Payer ID does not have a valid email address
-
-
-
Alternately, click the column selection icon to add the Delivery Status Details column to your view.

In addition to the above steps, a worklist can be created to manage your invoice failures by utilizing the Advanced Search feature. Worklists provide various filters, giving you the ability to customize your report.
Step 2: Confirm the Customer’s Invoice Delivery Method
The customer’s invoice delivery method can vary depending on whether the organization is:
-
Integrated – The organization transacts through GHX’s Exchange, feeding EDI documents directly into their MMIS for more efficient processing and automated system matching. GHX recommends this process for invoice delivery.
-
Non-Integrated – The organization does not have EDI capability through the Exchange. This customer can leverage eInvoicing’s invoice delivery options:
-
eInvoicing Portal – Gives access to PDF invoices and other helpful information like payment due dates, proof of delivery, invoice status, read/unread status, and more through an online portal
-
Email – Sends PDF invoices through email, but does not include the eInvoicing Portal’s helpful features
-
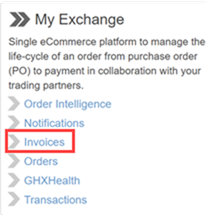
To verify your customer’s delivery method, GHX recommends contacting the customer by email or phone. Customer contact information may be found in:
-
Address book in My Exchange
-
Registration Center
After confirming the customer’s invoice delivery method, (integrated or non-integrated,) select the appropriate hyperlink(s) below for further details on how to proceed:
For an integrated customer:
For a non-integrated customer:
Step 3: Submit a Request for Electronic Invoices in Registration Center
-
Click the solution selector
 icon.
icon. -
Click Registration Center.
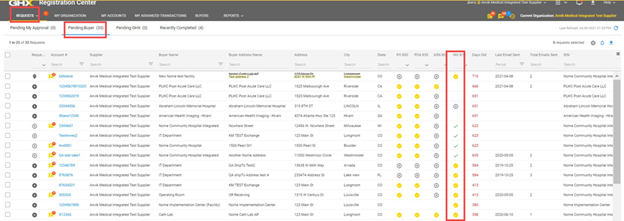
For Existing Integrated Customers
-
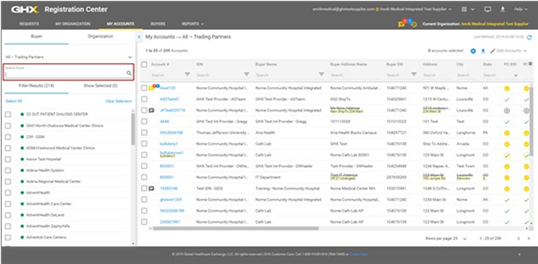
Click My Accounts.
-
Search for the customer using the account number, buyer name, or IDN. Alternately, search for accounts that are registered with individual facilities at your organization.
 Note: If you have subscribed to Single Channel, your page may have some additional features: the Requests drop-down that allows you to choose between your accounts and advanced transactions requests, and the My Advanced Transactions tab.
-
Click the hyperlinked account number.
Note: A green dot next to the customer name confirms a current trading relationship. -
Click the
 icon next to Invoice (810).Note: You can change the date when the request will take effect. The effective date is today by default. The status of the request changes to Pending Buyer Enable. Even after an effective date is entered, the provider must approve the request.
 -
Click Submit.
-
Click Requests. The Pending My Approval page opens.
-
Click the Pending Buyer tab to review the status of the request.
 Note: The customer needs to accept the business process request before invoicing can be enabled.
 -
Proceed to Step 6 in this document to resend the failed invoice.
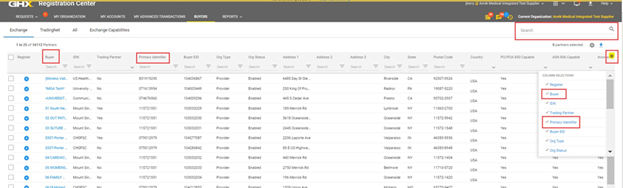
To Establish a Trading Partner Connection With an Integrated Customer With Whom You do not Already Have a Registered Account
-
Click the Buyers tab.
-
Search for the customer using the search bar, or filter using the Buyer or Primary Identifier columns.
-
Click the
icon next to the buyer’s name. -
Enter the following information in the online registration form:
-
Select the Buyer Address (usually the shipping address)
-
Enter the Account Number (usually your organization’s ship to account)
-
Select the business processes you wish to enable for this customer (e.g. PO, POA, ASN, invoice)
-
Click Add Account to add more accounts if needed
-
-
Click Register. The customer must approve the registration request for you to start transacting on the Exchange.
-
Proceed to Step 6 in this document to resend the failed invoice.
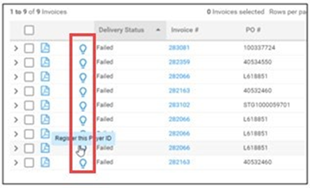
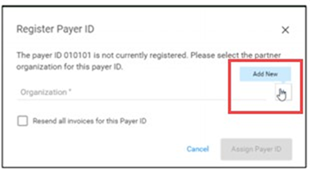
To Create a New Trading Partner for a Failed Invoice
This new functionality allows eInvoicing suppliers to create new partners without cancelling the Add Payer ID action.
-
Select the Lightbulb icon to register this payer ID with eInvoicing. A new Add New icon is added to the Register Payer ID dialog box.


-
Once boarding has been completed and approved in the Registration Center application, the integrated trading partner setup can be completed, and the failed invoice(s) can then be resubmitted. An option to Resend all invoices for this Payer ID is added to the initial Register Payer ID screen.

-
Proceed to Step 6 in this document to resend the failed invoice.

Step 4: Grant eInvoicing Portal Access to Individual Customer Users
-
Click Admin.
-
Click Users. The Users page opens.
For Existing eInvoicing Users
-
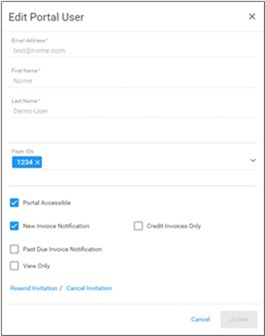
Click the user’s email address. The Edit Portal User dialog box opens.

-
Select the following checkboxes as needed:
-
Portal Accessible – The user can view invoices in the portal and mark them as read, filter invoices, run reports, access advanced search, create personal worklists, print and/or download rendered images, print, download, export and email invoice details, and find proof of delivery tracking (if applicable)
-
New Invoice Notification – The user can receive notifications when new invoices are available in the portal
-
Credit Invoices Only – The user can receive notifications for only credit invoices
-
Past Due Invoice Notification – The user can receive notifications when past due invoices are available in the portal, if this feature has been implemented
-
View Only – The user can access the portal to view invoices; this action does not change the invoices status to Read
-
-
Click Invite or Resend Invitation.
-
Click Update.
-
Proceed to Step 5 in this document to configure email delivery for your non-integrated trading partners.
For New eInvoicing Users not Listed on the Users Page
-
Click the
 icon. The Add Portal User dialog box opens.
-
Define the information in the following fields:
-
Email Address
-
First Name
-
Last Name
Note: When selecting the trading partner to associate with this user, start typing the name - you should see it begin to auto-populate. -
-
Select an option from the Payer IDs list (optional). This is the buyer ID.
-
Select the following checkboxes as needed:
-
Portal Accessible – The user can view invoices in the portal and mark them as read
-
New Invoice Notification – The user can receive notifications when new invoices are available in the portal
-
Credit Invoices Only – The user can receive notifications for only credit invoices
-
Past Due Invoice Notification – The user can receive notifications when past due invoices are available in the portal
-
View Only – The user can access the portal to view invoices; this action does not change the invoices status to Read
-
-
Click Add. An email message is sent to the user that includes access to the eInvoicing portal.
-
Proceed to Step 5 in this document to configure email delivery for the customer organization.

Step 5: Configure Email Delivery for a Customer Organization (Non-Integrated Customers Only)
-
Click Admin.
-
Click Partners. The Partners page opens.
For Existing eInvoicing Customer Organizations
-
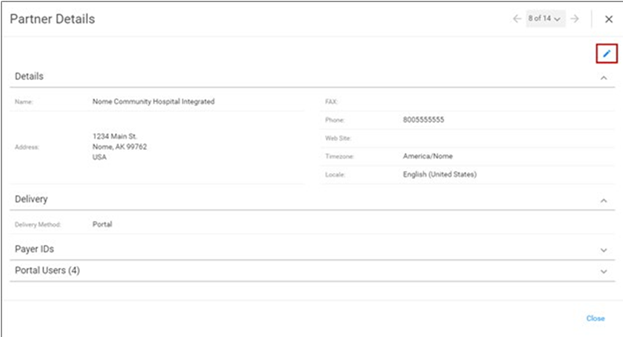
Click the partner name. The Partner Details dialog box opens.

-
Click the
 icon.
icon. -
Click the Email button.
-
Select the Invoice Template.
-
Select the Cover Letter.
-
Enter the appropriate email address in the Recipient field. A distribution email address may be the most effective at delivering invoices to many customer recipients.
-
Enter additional email addresses in Email Address field and click Add as CC.
-
Click Update.
-
Proceed to Step 6 in this document to resend the failed invoice.
For New eInvoicing Customer Organizations not Listed on the Partners Page
-
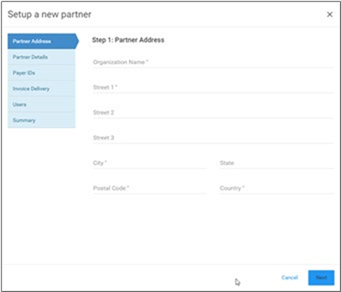
Click the
icon. The Select Organization to associate with Partner dialog box opens. -
Select an organization level from the list and click Next. The Setup a new partner wizard opens.

-
Type the organization name and address and click Next. Step 2 opens.
-
Type the partner details and click Next. Step 3 opens.
-
Add one or more payer IDs and click Next. Step 4 opens.
-
Select Email.
-
Enter the appropriate email address in the Recipient field. A distribution email address may be the most effective at delivering invoices to many customer recipients.
-
Enter additional email addresses in Email Address field and click Add as CC.
-
Click Next.
-
Click the
icon to create new portal users. -
Click Next. Step 6 opens.
-
Confirm that the partner information is correct. Click Submit.
-
Proceed to Step 6 in this document to resend the failed invoice.
Step 6: Reprocess the Failed Invoice(s)
-
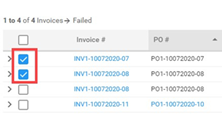
Click Failed under the By Status section in Quick Clicks to return to the failed invoices list. Your failed invoices display in the pane to the right.

-
Select one or more invoices to resend.

-
Click the
 .
.