Manage Parked POs
Tip: When rejecting orders and lines, if your organization has been configured for auto-generation of POAs back to your buyers, then your organization can implement rejection reason lists. This saves time and standardizes the reasons for rejection. To have a standardized list of rejection reasons configured for your organization, contact support@ghx.com or your CSM.
Intelligent Business Rules supports organizations whose teams manage parked PO lines through item mapping and manual line editing. Item mapping drives future order automation and is typically recommended as best practice. Manual line edits support one-off updates to line data without rule creation and can be employed if your organization has specific business requirements for order processing that render item mapping neither possible nor desirable.
- Click Orders. The Orders page opens.
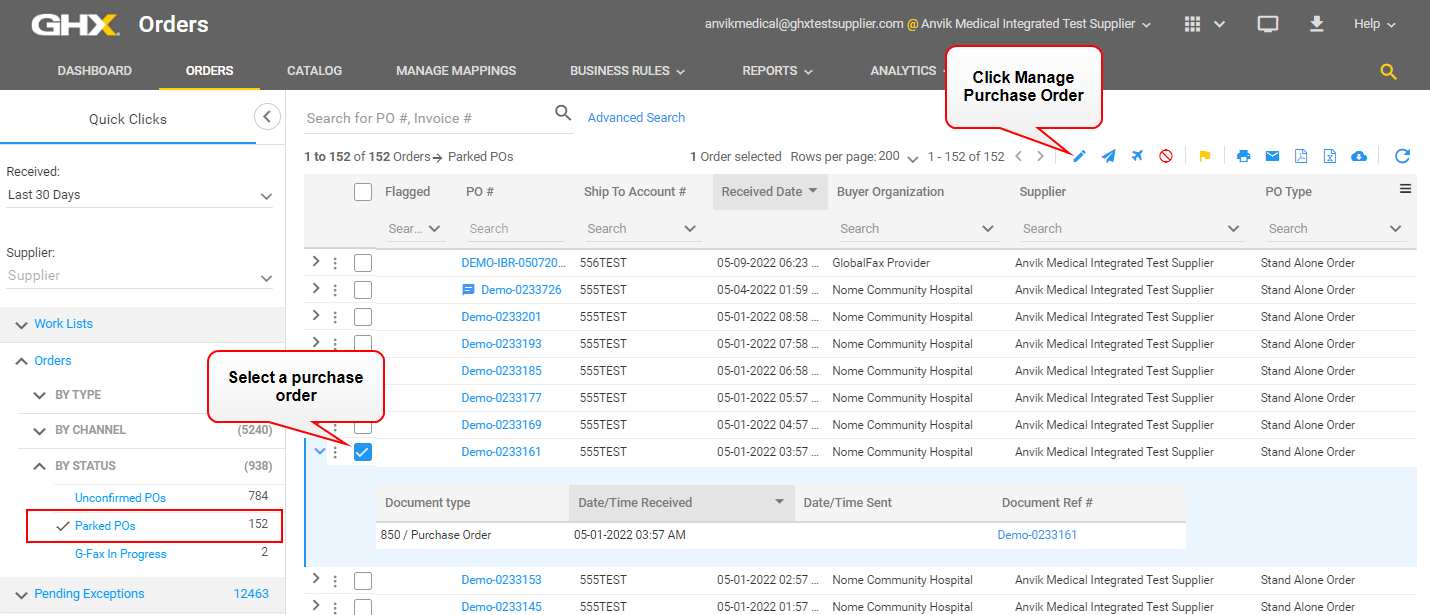
- Click the Parked POs Quick Clicks option to filter the PO list.
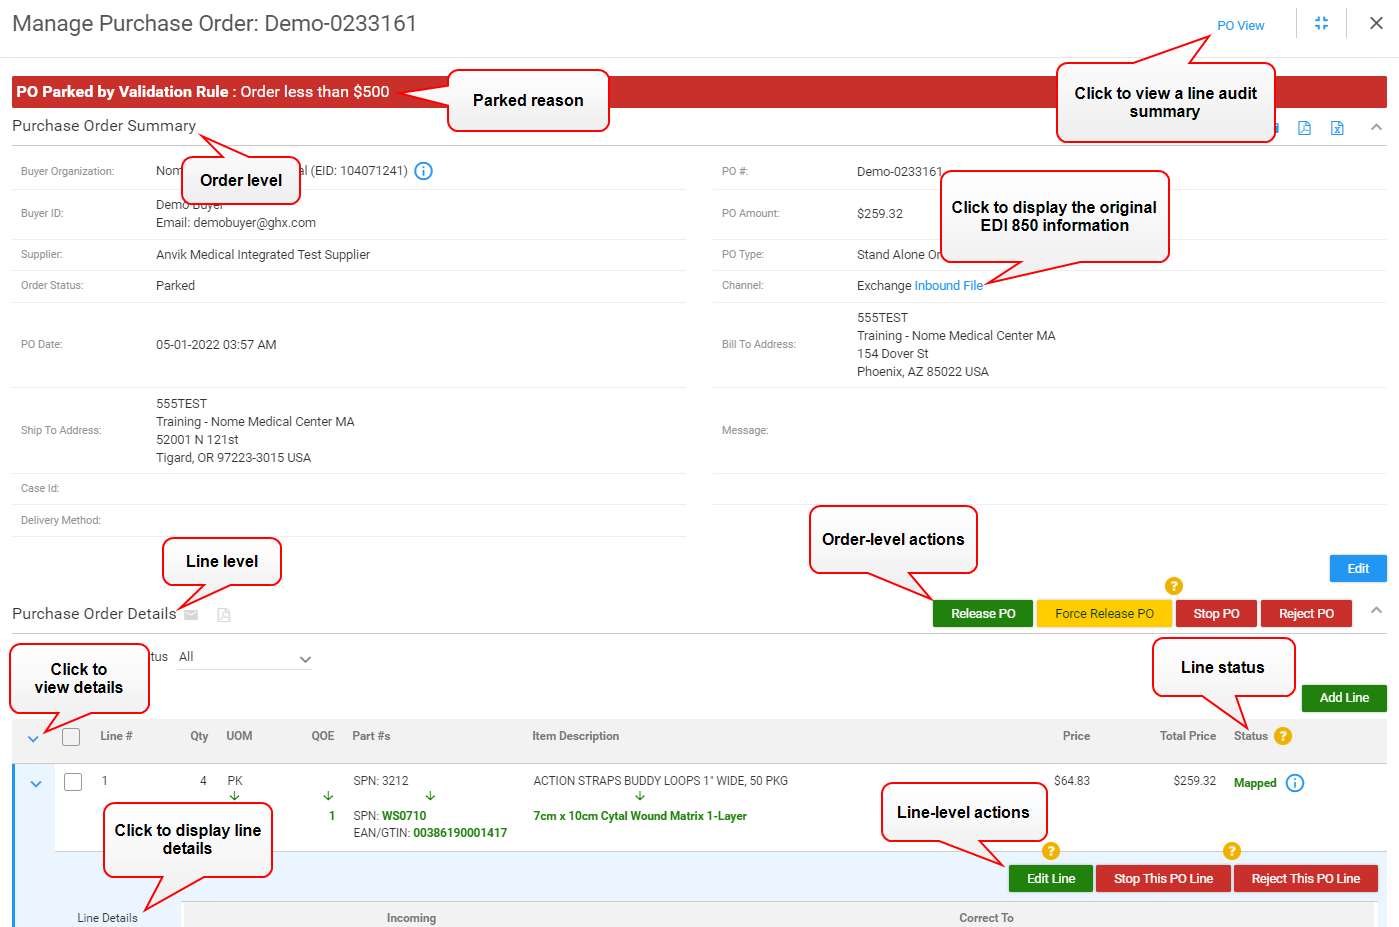
- Select a purchase order and either click the link in the PO column or click the Manage Purchase Order
 icon. The Manage Purchase Order dialog box opens.
Tip: You can select one or more POs when taking the Stop and Force Release actions.
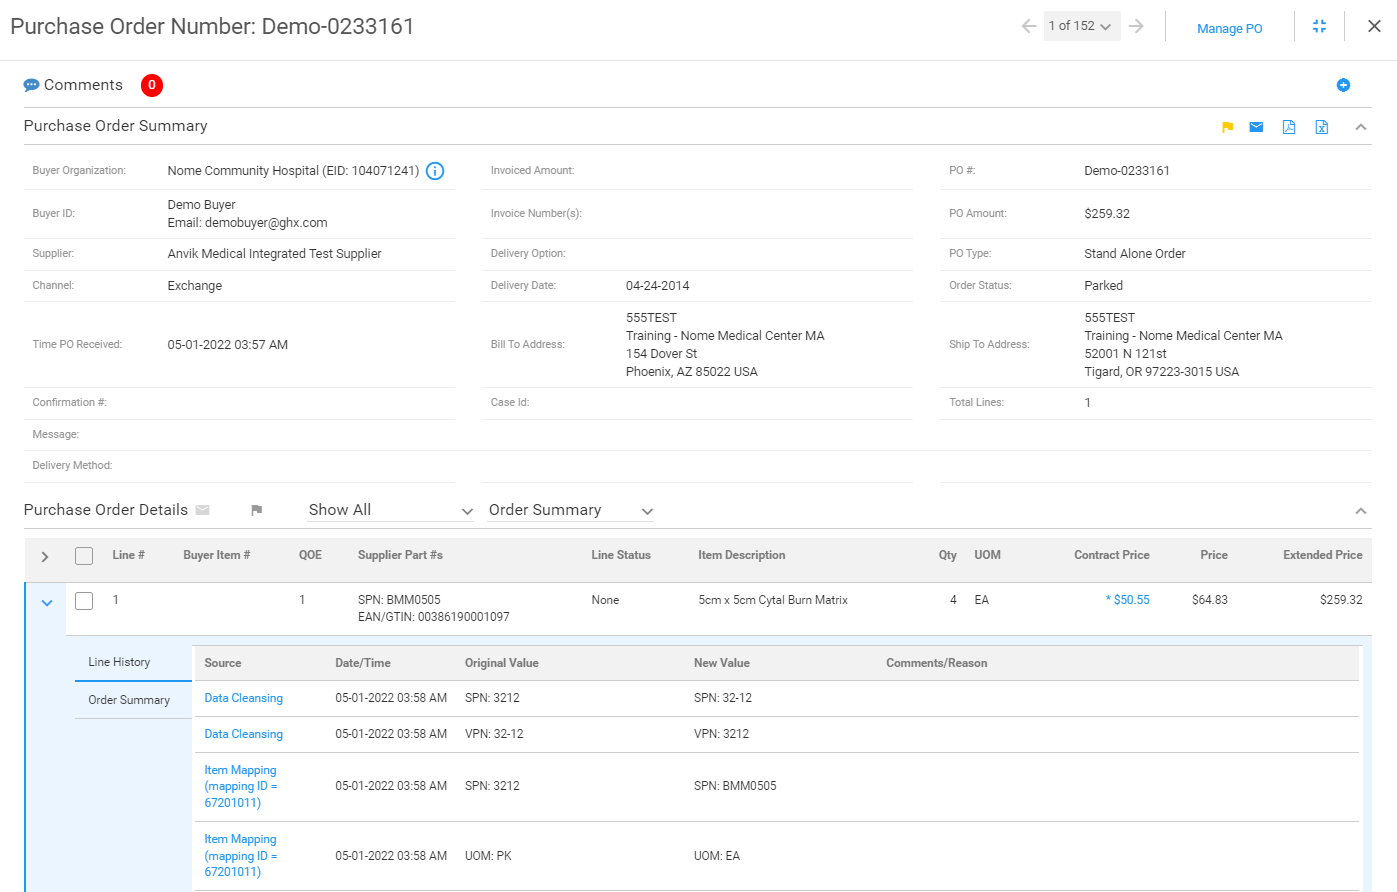
- Click the PO View link in the header on the right to view order line audit, summary information, and full document history information (optional).

- Review the order and line details to determine why it was parked and what actions are necessary.
Tip: When you edit a parked POs header information, the Bill To Account and Ship To Account numbers display the numbers that existed at the time the PO was parked.
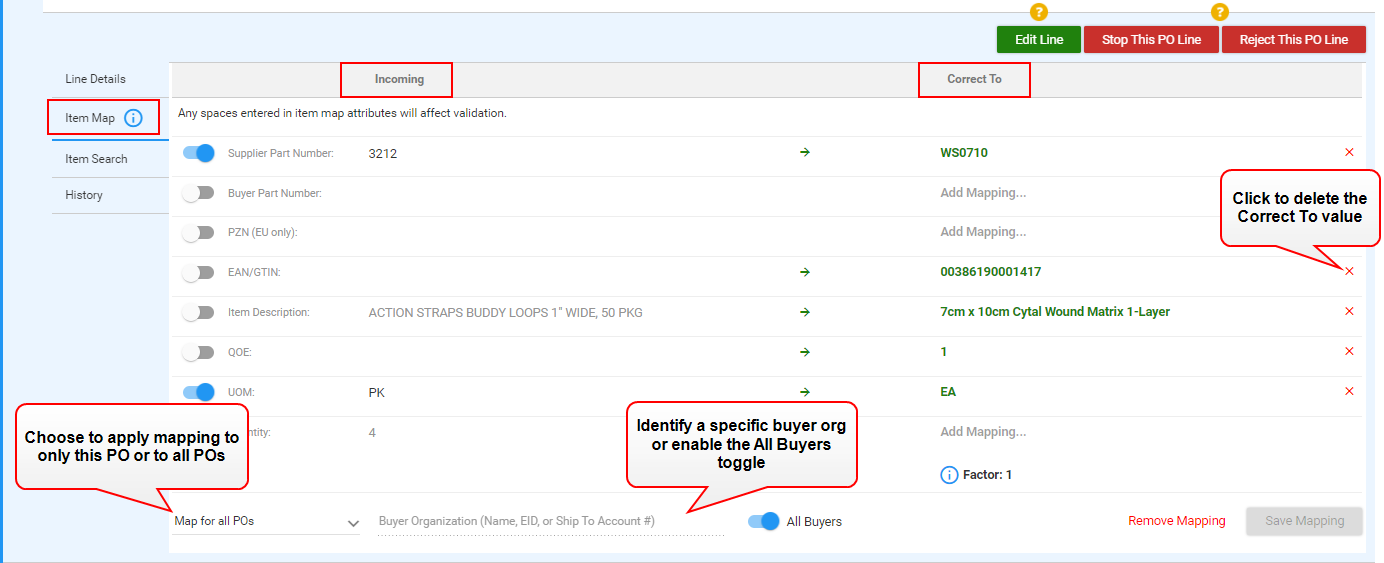
When the toggle icon is enabled
 , the Incoming value will be replaced with the Correct To value.
 Choose whether to apply this mapping to only this order (Map for this PO only) or to all orders (Map for all POs).
Caution: Carefully consider the use of the Map for all POs option. When this option is selected, each time your organization receives these Incoming values the system will change them to the Correct To values.
Note: To change the default option to Map for this PO only for your entire organization, send a request to support@ghx.com.
Define whether you want this mapping to apply to a specific buyer organization (type the buyer org name in the Buyer Organization field) or to all buyers (enable the All Buyers toggle).
If certain attributes are causing problems with a customer's ERP or other transactions like POAs, your organization can contact GHX Customer Care to disable those attributes from the Item Map tab. This action will hide them from all POs.
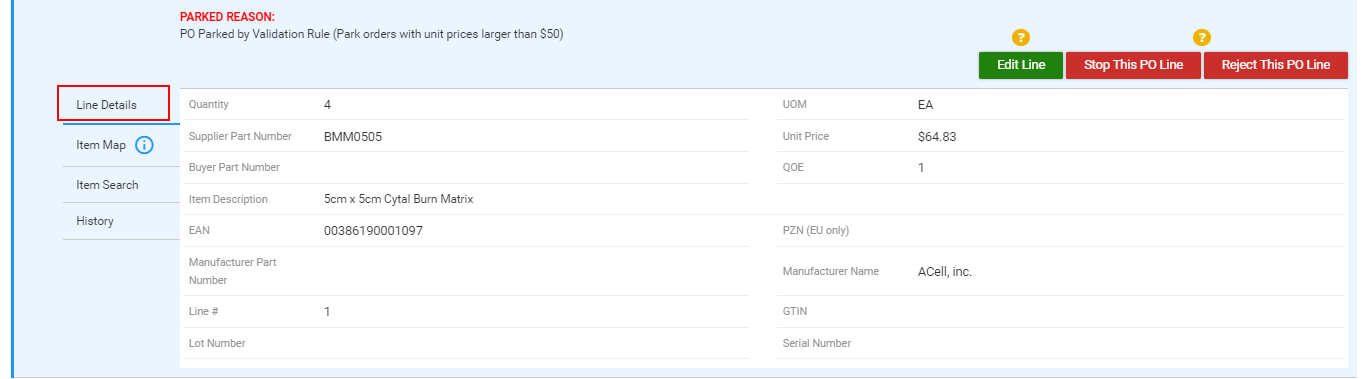
 Line Details
Shows the data that was extracted from the order document, including buyer comments at the line level. For example, when the inbound file contains a part number, such as the SPN, PZN, or EAN, that information shows here. You can use this information when creating item mappings.
Tip: The Parked Reason in the red box at the top of the page identifies the reason why the order line was parked. For the PO Parked by Validation Rule reason, the rule name is also shown. Look at the line-level history in the Purchase Order Details to see what happened to each line.
 Item Map
You can create and edit maps on this tab. The Incoming column on the left shows the inbound mapping (when mapping exists). These item attributes are from the original PO. When your business rules enhance the item, that information is also in the Incoming column. Mapping information is in the Correct To column on the right.
Note: The Factor calculation can be applied to the "Quantity" or to the "Quantity and Price." To calculate the Factor, you will specify the Quantity in the Incoming and the Correct To columns along with the SPN and UOM. The system rounds up to the next integer when the calculation is fractional. The PO Amount and line level Extended Price will not be recalculated by default. This Factor feature requires a product configuration update to take effect. Contact GHX Customer Care to request this configuration, when it is needed.
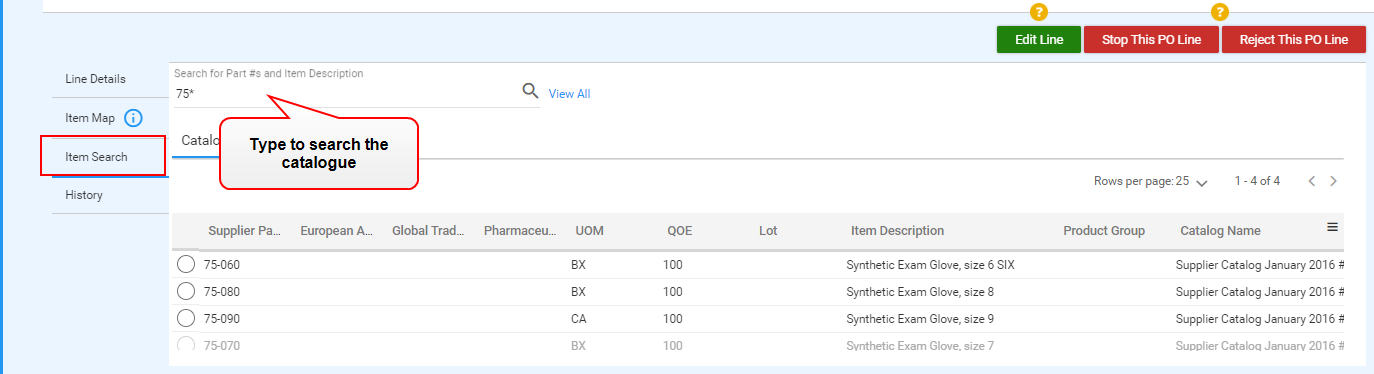
 Item Search
Type a part number or item description in the search field to look up the item in your catalog. You can create and edit maps on this tab and you can limit the mapping to this order or apply it to all orders.
 History
Shows a line-level audit of business rules that have influenced the order. History provides visibility into data cleansing and enrichment, including the application of item mappings.
- Take the appropriate order-level and line-level actions. Click the
 icon to view order line details (optional).
Note: If you stop or reject an order line in error, click the Cancel Reject This PO Line button.
Order-level actions:Order-Level Action When to Use What Happens Release PO Use when you want to accept the PO as it is and return the document and its saved mappings back through the business rules processing for outbound delivery.
Reprocesses the entire PO through your business rules logic and releases it to your ERP system.
Note: It is possible for a PO to re-park because of another validation failure.
Force Release PO Use when you want to deliver the PO as it is without any further business rules processing. There are three options*:
- Deliver the order without Item Map, Global or Validation Rules updates – Delivers the original inbound PO version without Intelligent Business Rules changes to your ERP system.
- Deliver the document as parked not including new mapping changes – Delivers the PO version as it stands in its current state to your ERP system. Any changes made to item mappings while managing the PO will be dropped and not executed.
- Deliver the document as parked including new mapping changes – Re-runs the catalog validation and item mapping logic and delivers the PO document in that state to your ERP. New item maps are executed for order line updates if they were added. No parking conditions will be evaluated so the PO will not park again. (This is the most commonly selected option.)
*To set one of these Force Release PO options as your organization’s default, contact support@ghx.com.
Stop PO Use when you want to stop a PO without having a notification sent to your trading partner.
Typically used by European (EU) organizations since they do not have trading partner relationships on the Exchange.
May be used by North American (NA) organizations when they are cleaning up orders, such as duplicate orders, for example.
Stops the entire PO from reaching your ERP but does not send a POA (Purchase Order Acknowledgement, EDI 855) response to the buyer. The outcome for the PO document itself is the same when using Stop PO and Reject PO; the latter is more conducive for buyer visibility among NA organizations. Reject PO Use when you want to reject a PO and send a notification to your trading partner. Typically used by NA organizations since they transact with an active, integrated buyer community on the Exchange.
You are required to include a rejection reason that specifies the correction needed by the buyer for future orders. Example reasons for rejecting a PO are an item is on backorder, not in stock, no longer carried, obsolete, or needs to be directed to another department.
Stops the entire PO from reaching your ERP and sends a POA (EDI 855) response to the buyer to update their MMIS. The rejection is displayed in My Exchange Orders.
To have a standardized list of rejection reasons configured for your organization, which can save your users time, contact support@ghx.com or your CSM.
Line-level actions:Line-Level Action When to Use What Happens Edit Line
Use when you need to update this specific line but do not want to create an Item Map as a rule for reuse on future PO lines.
You manually edit the line data and click Save. The system assumes the edits are correct and does not verify the data against the organization's catalog. Instead, the modified EDI 850 is delivered as is to your ERP when you click Release PO.
See Edit Lines for Parked POs for details.
Stop This PO Line Use when you want to stop a PO line but do not need to inform the buyer as to why it was stopped.
This is typically used by European (EU) organizations since they do not have trading partner relationships on the Exchange.
The line is removed from the PO document and the PO is released to your ERP when you click Release PO.
This action does not send a POA (EDI 855) response to the buyer.
Reject This PO Line Use when you want to reject a PO line and inform the buyer why it was rejected.
This is typically used by North American (NA) organizations since they transact with an active, integrated buyer community on the Exchange.
Use after you have searched for an item by part number or item description and your supplier catalog does not return a good match.
Possible reasons for no match are:
- Not on your approved account list for consignment items
- The product line has been expired
The same as the above, except that it does send a POA response to the buyer to inform them of the rejection reason so they can change their ordering behavior in the future.
The outcome for the PO document itself is the same when using Stop This PO Line and Reject This PO Line; the latter is simply more conducive for buyer visibility among NA organizations.
To have a standardized list of rejection reasons configured for your organization, which can save your users time, contact support@ghx.com or your CSM.
Note: When orders park due to both a line-level catalog check failure and an item-based validation rule, the Manage Purchase Order dialog box will show both parked reasons.